
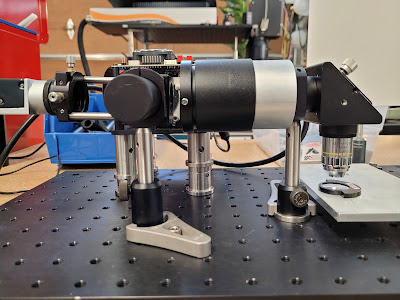
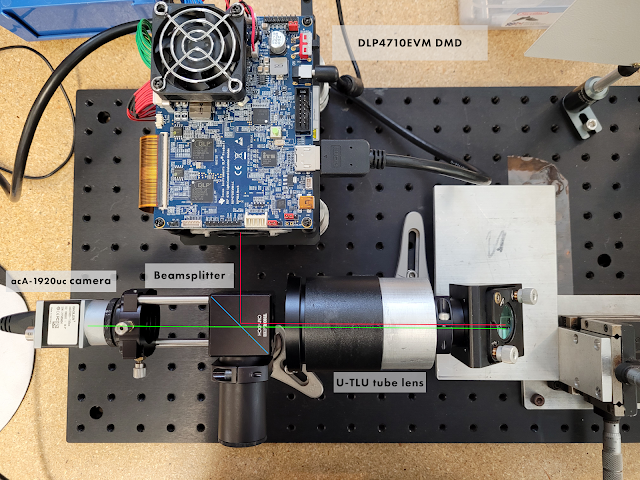
The DLP is an ordinary DLP projector with the lens removed - I used a TI dev kit because the firmware offers nice features like "disable the LEDs" which can be used to, for example, replace the blue LED with a violet one for exposing resist. Unless you have a really exotic objective it is probably best to use a g-line (430nm) LED rather than a 405nm LED - the 430nm parts are hard to find but objectives will be quite dispersive in the far violet unless they are specifically designed to be apochromatic from violet to red. Your best bet is probably to leave the green LED in place for focusing and replace the blue LED with a violet one. A regular pico-projector will work just fine, but is less convenient to work with. You do save about $800 at current street prices though.
The light from the DLP reflects off a beam splitter and passes through the tube lens, which is just a 200mm a(po)chromat. A 200mm doublet would probably work fine here, but you can get better corner performance from a triplet or a quadruplet - the DLP is not very large though, so it might not matter. The tube lens collimates the light and sends it down the microscope objective, which focuses it on the target.
The camera looks down the other beam splitter path and sees the light scattered off the target. Unfortunately, this technique only works with optically smooth targets - otherwise, the camera sees the surface texture of the target and not the imaged patterns displayed on the DLP.
Parfocalizing the camera and the DLP is easier than it seems - the object side of the tube lens is something like f/50 so the depth of field is very large. Roughly speaking, there is only a small range of distances where the the objective comes into focus at all. Either by reading the datasheet or by trial and error it is possible to roughly set the backfocus, then the camera and target position are adjusted for best focus. Once a starting position is found, the backfocus can be adjusted to minimize spherical aberration (microscope objectives gain some spherical aberration if the conjugates aren't the right ones).
The pixel scale in the capture is 560nm/pixel, so the Windows clock is only a few microns long. Performance is as expected but it is always entertaining to use the Windows desktop on a 1mm wide screen :)
No comments:
Post a Comment